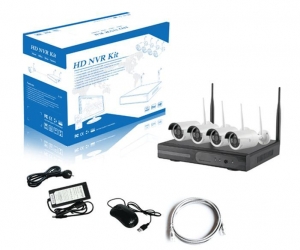
Wireless WIFI IP Camera NVR Kit Package-White

Location: Elephant-Road-Dhaka
Wireless WIFI IP Camera NVR Kit Package-White
- Double stream encoding / H.264 compression mode
- 1/3 "-inch AR0130 CMOS, 3.6mm fixed lens
- Night vision: 20 m (36 pcs leds)
- 1.3MP:960 -1280 * 720 D1: 640 * 480 CIF: 320 * 240
- NVR: Hi 3520A
- 1 SATA HDD support, maximum capacity 4T
- USB * 2;
- support 1CH audio / alarm output;
- support 1CH BNC / VGA / HDMI output;
- support 4CH 720 P / 1CH 1080 P playback;
- support 4CH 720P / 2CH 1080P real-time display and recording;
1sata 3.5inch 320GB-4TB hard drive (Not included) is needed for the system to record video. And you also need a monitor and a VGA/HDMI cable to hook up with the monitor.
NVR Specification:
Operating System: Embedded linux OS
Video resolution: 4ch 960P(1280 × 960) HD NVR with built-in Router
VGA & HDMI outputs up to 960P.
4 channel sync-playback, video recording
Playback mode: Realtime、Routine、Event.
HDD: Support 3.5" SATA HDD up to 4TB
Power: DC 12V2A
Consumption(excluding HDD) <= 5W
Working Temperature: -10℃-55℃
Working humidity: 10%-90%
960P Wifi Camera Specification:
Style: bullet ip canera, IP66 weatherproof, metal housing.
lens: 3.6mm
3 pcs infrared LED arrays, IR distance range up to 65ft.
960p(1280 x 960) high definition.
WiFi: 802.11b/g/n.
Working temperature/humidity: -10℃ to +50℃/30% to 80%RH.
Storage temperature/humidity: -20℃ to +60℃/20% to 90%RH.
Power: DC 12V1A

true plug & play and super easy to connect just plug the power of the nvr camera and connect with the network and power cord, nvr will automatically look for the ip address of the camera.


installation diagram

the Antenna signal coverage is similar to a round circle.antenna located in the center of the round circle, surrounding signal is much stronger, but much weaker if antenna endpoints backoff direction, divergence characteristics according to the antenna signal, and in order to ensure the quality of the video, IPC antenna must try to keep in parallel or tangent with NVR antenna.
Installation steps:
- remove the dvr screw
- connect the HDD cable and power line
- Assmble the screw, and fasten the HARD DRIVE on the bottom ofNVR
- close the cover and correct i


-
confirm that the accessible AC voltage matches with DVR.ensure that the DVR power socket will connect with a good grounding ground means.after switching power, the device started, [POWER] light is on.turn on system, if the flashing panel status light, is under normal conditions.
Software operation
- add camera by match code
steps: right click on the main interface, and click on video management, enter the video management interface
Two Ways to IPC Wireless NVR to Add, Code Add and Auto Add
the addition of camera by correspondence code, the camera transmits video images through wireless and NVR, IP is 172.20.14.X;
Auto add the camera, the camera transmits video images through the cable and NVR;note: the camera has been accompanied by the factory, there is no need to add other cameras.if you need to combine a code, firstly take a network cable and connect to any NVR port lan and power on the device to make sure there are still any channel can add a camera.
- video playback
step:right click on the main menu-Video playback-choose the No.-choice channel
Recording mode-In Search of time, start time and end time-click search, recording will exit, drag the time bar-click play to start
Tips:Playback Icon Input: Playback Playback 1 Previous Frame 1 Frame

- video backup
step:right-click the main menu-Backup Video-choose the No-channel-choose recording mode-in Time Search, start time and end time of the input-click search, recording will exit-choose video that need backup-click backup videotips:support 32G U max backup disk, every one hour recording will be packed

- video detection
Step 1: Right-click on the main menu- & raquo;system configuration- & raquo;configuration log- & raquo;choose move-choose all- & raquo;click Copy to- & raquo;click OK to save the setting.
Step 2:Choose Video Detection - & raquo;set the necessary sensitivity- & raquo;choose movement- & raquo;set Alarm, Buzzer or E-mail as required- & raquo;click Copy to- & raquo;click OK to save configuration.

- generate EseeID
a necessary condition to generate Esee ID is that make sure video recorder is connected to the network, and IP address is available right-click on the main menu-configuration system-network configuration if the user is familiar with the LAN, then there is no need to choose the DHCP that help to obtain automation-mind IP address.enter the IP address manually andDNS address, video recorder will generate IDENTITY by network, once generate, it will appear in the menu
if the user is not familiar with LAN, or video recorder is network independent, can choose DHCP to obtain available IP address


- LAN access
Step 1: Right-click the main menu-System Configuration-Network Configuration-IP Address Verification video recorder
step2: Computer access on the same LAN, video recorder input IP address and port (If the port is 80, there is no need to input) in IE browser or any other browser.then it will have LAN access log in web page, username and password, input enterstep 3:once the access successfully, can have video
tips:please make sure video recorder and computer in same network segement
Android mobile app download
(two ways to download)

access on WANcomputer not Accessby on the same router with video recorder
Step 1: Right-click the main menu-System Configuration-Network Configuration-IP Address Verification video recorder
Step 2:Open the IE browser, typeWWW.e-seenet.comin the address bar.
then it will access log in web page, input ID, username and password, click loginstep 3:once the access successfully, can have video
tips:Video quality and fluency depend on the video recorder Speed upload and download speed on the side of the computer side, each channel needs up to 30KB

No. 1: right-click on the main menu-Setup Wizard- *show three QR code Android User scan QR CODE for the application for android by mobile directly, enter the download page, click download for mobile to install
No. 2:go towww.e-seenet.com/help/download.phpin the mobile browser, go to the download page, click on download for mobile
No. 3:go towww.e-seenet.comon computer, click on software download help find mobile android application, click download to save on computer, then copy to mobile to install

- download and install IPhone applications
Step 1: Go to the App Store
step 2:search Eseecloud
Step 3:Apple ID to verify the entry
- Esee mobile application (Eseecloud) -Add device
step 1: register
step 2:enter the device interface
Step 3:Add Device
Step 4:Added Successfully.click on the channel.to get videostep 5:Remote playback

Box includes?
1x 4 CH 960P HD NVR without hard drive
4x Wireless 960P HD Weatherproof Night Vision IP Cameras
1x 12V 2A Power Adapter for NVR(3.3ft)
4x 12V 1A Power Adapters for Cameras(10ft)
1x 3.3ft Network Cable
1x Mouse
1x User Guide


